样式定制与使用 Tailwind CSS
VitePress 的缺省主题提供了一系列的样式定制选项,可参见:定制CSS
在这里,我们先进行缺省的定制,然后还将引入 Tailwind CSS 以便更方便地控制文档样式。
定制 CSS
1. 页面主题的样式定制入口
VitePress 页面主题的入口是:.vitepress/theme/index.ts,目前它的页面如下:
ts
// https://vitepress.dev/guide/custom-theme
import { h } from 'vue'
import type { Theme } from 'vitepress'
import DefaultTheme from 'vitepress/theme'
import './style.css'考虑到我们将进行较多的 CSS 配置,因此新建 styles 目录,并将 styles.css 修改为custom.css 移入。
ts
import './styles/custom.css'其中有大量的可定制的,可具体查看文件:
custom.css
css
/**
 * Customize default theme styling by overriding CSS variables:
 * https://github.com/vuejs/vitepress/blob/main/src/client/theme-default/styles/vars.css
 */

/**
 * Colors
 *
 * Each colors have exact same color scale system with 3 levels of solid
 * colors with different brightness, and 1 soft color.
 *
 * - `XXX-1`: The most solid color used mainly for colored text. It must
 *   satisfy the contrast ratio against when used on top of `XXX-soft`.
 *
 * - `XXX-2`: The color used mainly for hover state of the button.
 *
 * - `XXX-3`: The color for solid background, such as bg color of the button.
 *   It must satisfy the contrast ratio with pure white (#ffffff) text on
 *   top of it.
 *
 * - `XXX-soft`: The color used for subtle background such as custom container
 *   or badges. It must satisfy the contrast ratio when putting `XXX-1` colors
 *   on top of it.
 *
 *   The soft color must be semi transparent alpha channel. This is crucial
 *   because it allows adding multiple "soft" colors on top of each other
 *   to create a accent, such as when having inline code block inside
 *   custom containers.
 *
 * - `default`: The color used purely for subtle indication without any
 *   special meanings attched to it such as bg color for menu hover state.
 *
 * - `brand`: Used for primary brand colors, such as link text, button with
 *   brand theme, etc.
 *
 * - `tip`: Used to indicate useful information. The default theme uses the
 *   brand color for this by default.
 *
 * - `warning`: Used to indicate warning to the users. Used in custom
 *   container, badges, etc.
 *
 * - `danger`: Used to show error, or dangerous message to the users. Used
 *   in custom container, badges, etc.
 * -------------------------------------------------------------------------- */

 :root {
  --vp-c-default-1: var(--vp-c-gray-1);
  --vp-c-default-2: var(--vp-c-gray-2);
  --vp-c-default-3: var(--vp-c-gray-3);
  --vp-c-default-soft: var(--vp-c-gray-soft);

  --vp-c-brand-1: var(--vp-c-indigo-1);
  --vp-c-brand-2: var(--vp-c-indigo-2);
  --vp-c-brand-3: var(--vp-c-indigo-3);
  --vp-c-brand-soft: var(--vp-c-indigo-soft);

  --vp-c-tip-1: var(--vp-c-brand-1);
  --vp-c-tip-2: var(--vp-c-brand-2);
  --vp-c-tip-3: var(--vp-c-brand-3);
  --vp-c-tip-soft: var(--vp-c-brand-soft);

  --vp-c-warning-1: var(--vp-c-yellow-1);
  --vp-c-warning-2: var(--vp-c-yellow-2);
  --vp-c-warning-3: var(--vp-c-yellow-3);
  --vp-c-warning-soft: var(--vp-c-yellow-soft);

  --vp-c-danger-1: var(--vp-c-red-1);
  --vp-c-danger-2: var(--vp-c-red-2);
  --vp-c-danger-3: var(--vp-c-red-3);
  --vp-c-danger-soft: var(--vp-c-red-soft);
}

/**
 * Component: Button
 * -------------------------------------------------------------------------- */

:root {
  --vp-button-brand-border: transparent;
  --vp-button-brand-text: var(--vp-c-white);
  --vp-button-brand-bg: var(--vp-c-brand-3);
  --vp-button-brand-hover-border: transparent;
  --vp-button-brand-hover-text: var(--vp-c-white);
  --vp-button-brand-hover-bg: var(--vp-c-brand-2);
  --vp-button-brand-active-border: transparent;
  --vp-button-brand-active-text: var(--vp-c-white);
  --vp-button-brand-active-bg: var(--vp-c-brand-1);
}

/**
 * Component: Home
 * -------------------------------------------------------------------------- */

:root {
  --vp-home-hero-name-color: transparent;
  --vp-home-hero-name-background: -webkit-linear-gradient(
    120deg,
    #bd34fe 30%,
    #41d1ff
  );

  --vp-home-hero-image-background-image: linear-gradient(
    -45deg,
    #bd34fe 50%,
    #47caff 50%
  );
  --vp-home-hero-image-filter: blur(44px);
}

@media (min-width: 640px) {
  :root {
    --vp-home-hero-image-filter: blur(56px);
  }
}

@media (min-width: 960px) {
  :root {
    --vp-home-hero-image-filter: blur(68px);
  }
}

/**
 * Component: Custom Block
 * -------------------------------------------------------------------------- */

:root {
  --vp-custom-block-tip-border: transparent;
  --vp-custom-block-tip-text: var(--vp-c-text-1);
  --vp-custom-block-tip-bg: var(--vp-c-brand-soft);
  --vp-custom-block-tip-code-bg: var(--vp-c-brand-soft);
}

/**
 * Component: Algolia
 * -------------------------------------------------------------------------- */

.DocSearch {
  --docsearch-primary-color: var(--vp-c-brand-1) !important;
}2. 尝试调整品牌色
我们可尝试着调整 brand 色彩,brand: 用于主要品牌颜色,例如链接文本、带有品牌主题的按钮等。
其中,每种色彩都分成四类:
XXX-1:主要用于有色文本的最饱和颜色。它必须满足在XXX-soft上使用时的对比度比例。XXX-2:主要用于按钮悬停状态的颜色。XXX-3:用于实心背景的颜色,例如按钮的背景色。它必须满足与白色文本(#ffffff)在其上的对比度比例。XXX-soft:用于如自定义容器或徽章等微妙背景的颜色。在其上放置XXX-1颜色时,必须满足对比度比例。
在 custom.css 的最后增加,在调整样式时要注意引入的先后顺序:
css
/* .vitepress/theme/styles/custom.css */
:root {
  --vp-c-brand-1: #ee0000;
  --vp-c-brand-2: #cc0000;
}使用 Tailwind CSS
为了更方便地调整文档样式,我们将使用 Tailwind CSS。详尽的使用指南请参考Tailwind CSS文档
1. 安装 Tailwind CSS
bash
npm install -D tailwindcss postcss autoprefixer
npx tailwindcss init -p2. 配置 tailwind.config.js
配置 Tailwind 渲染如下文件,见第4、5行。注意,第5行是需要的,否则 theme 不能奏效。
js
/** @type {import('tailwindcss').Config} */
module.exports = {
  content: [
    './docs/**/*.{md,vue,ts,js}',
    './docs/.vitepress/theme/**/*.{md,vue}'
  ],
  theme: {
    extend: {},
  },
  plugins: [],
}3. 增加 tailwind.css
创建文件 styles/tailwind.css写入如下内容:
css
/* .vitepress/theme/styles/tailwind.css */
@tailwind base;
@tailwind components;
@tailwind utilities;将 tailwind.css 加入到 theme/index.ts
ts
// .vitepress/theme/index.js
import DefaultTheme from 'vitepress/theme'
import './styles/custom.css'
import './styles/tailwind.css'

export default DefaultTheme4. 尝试使用 tailwind css
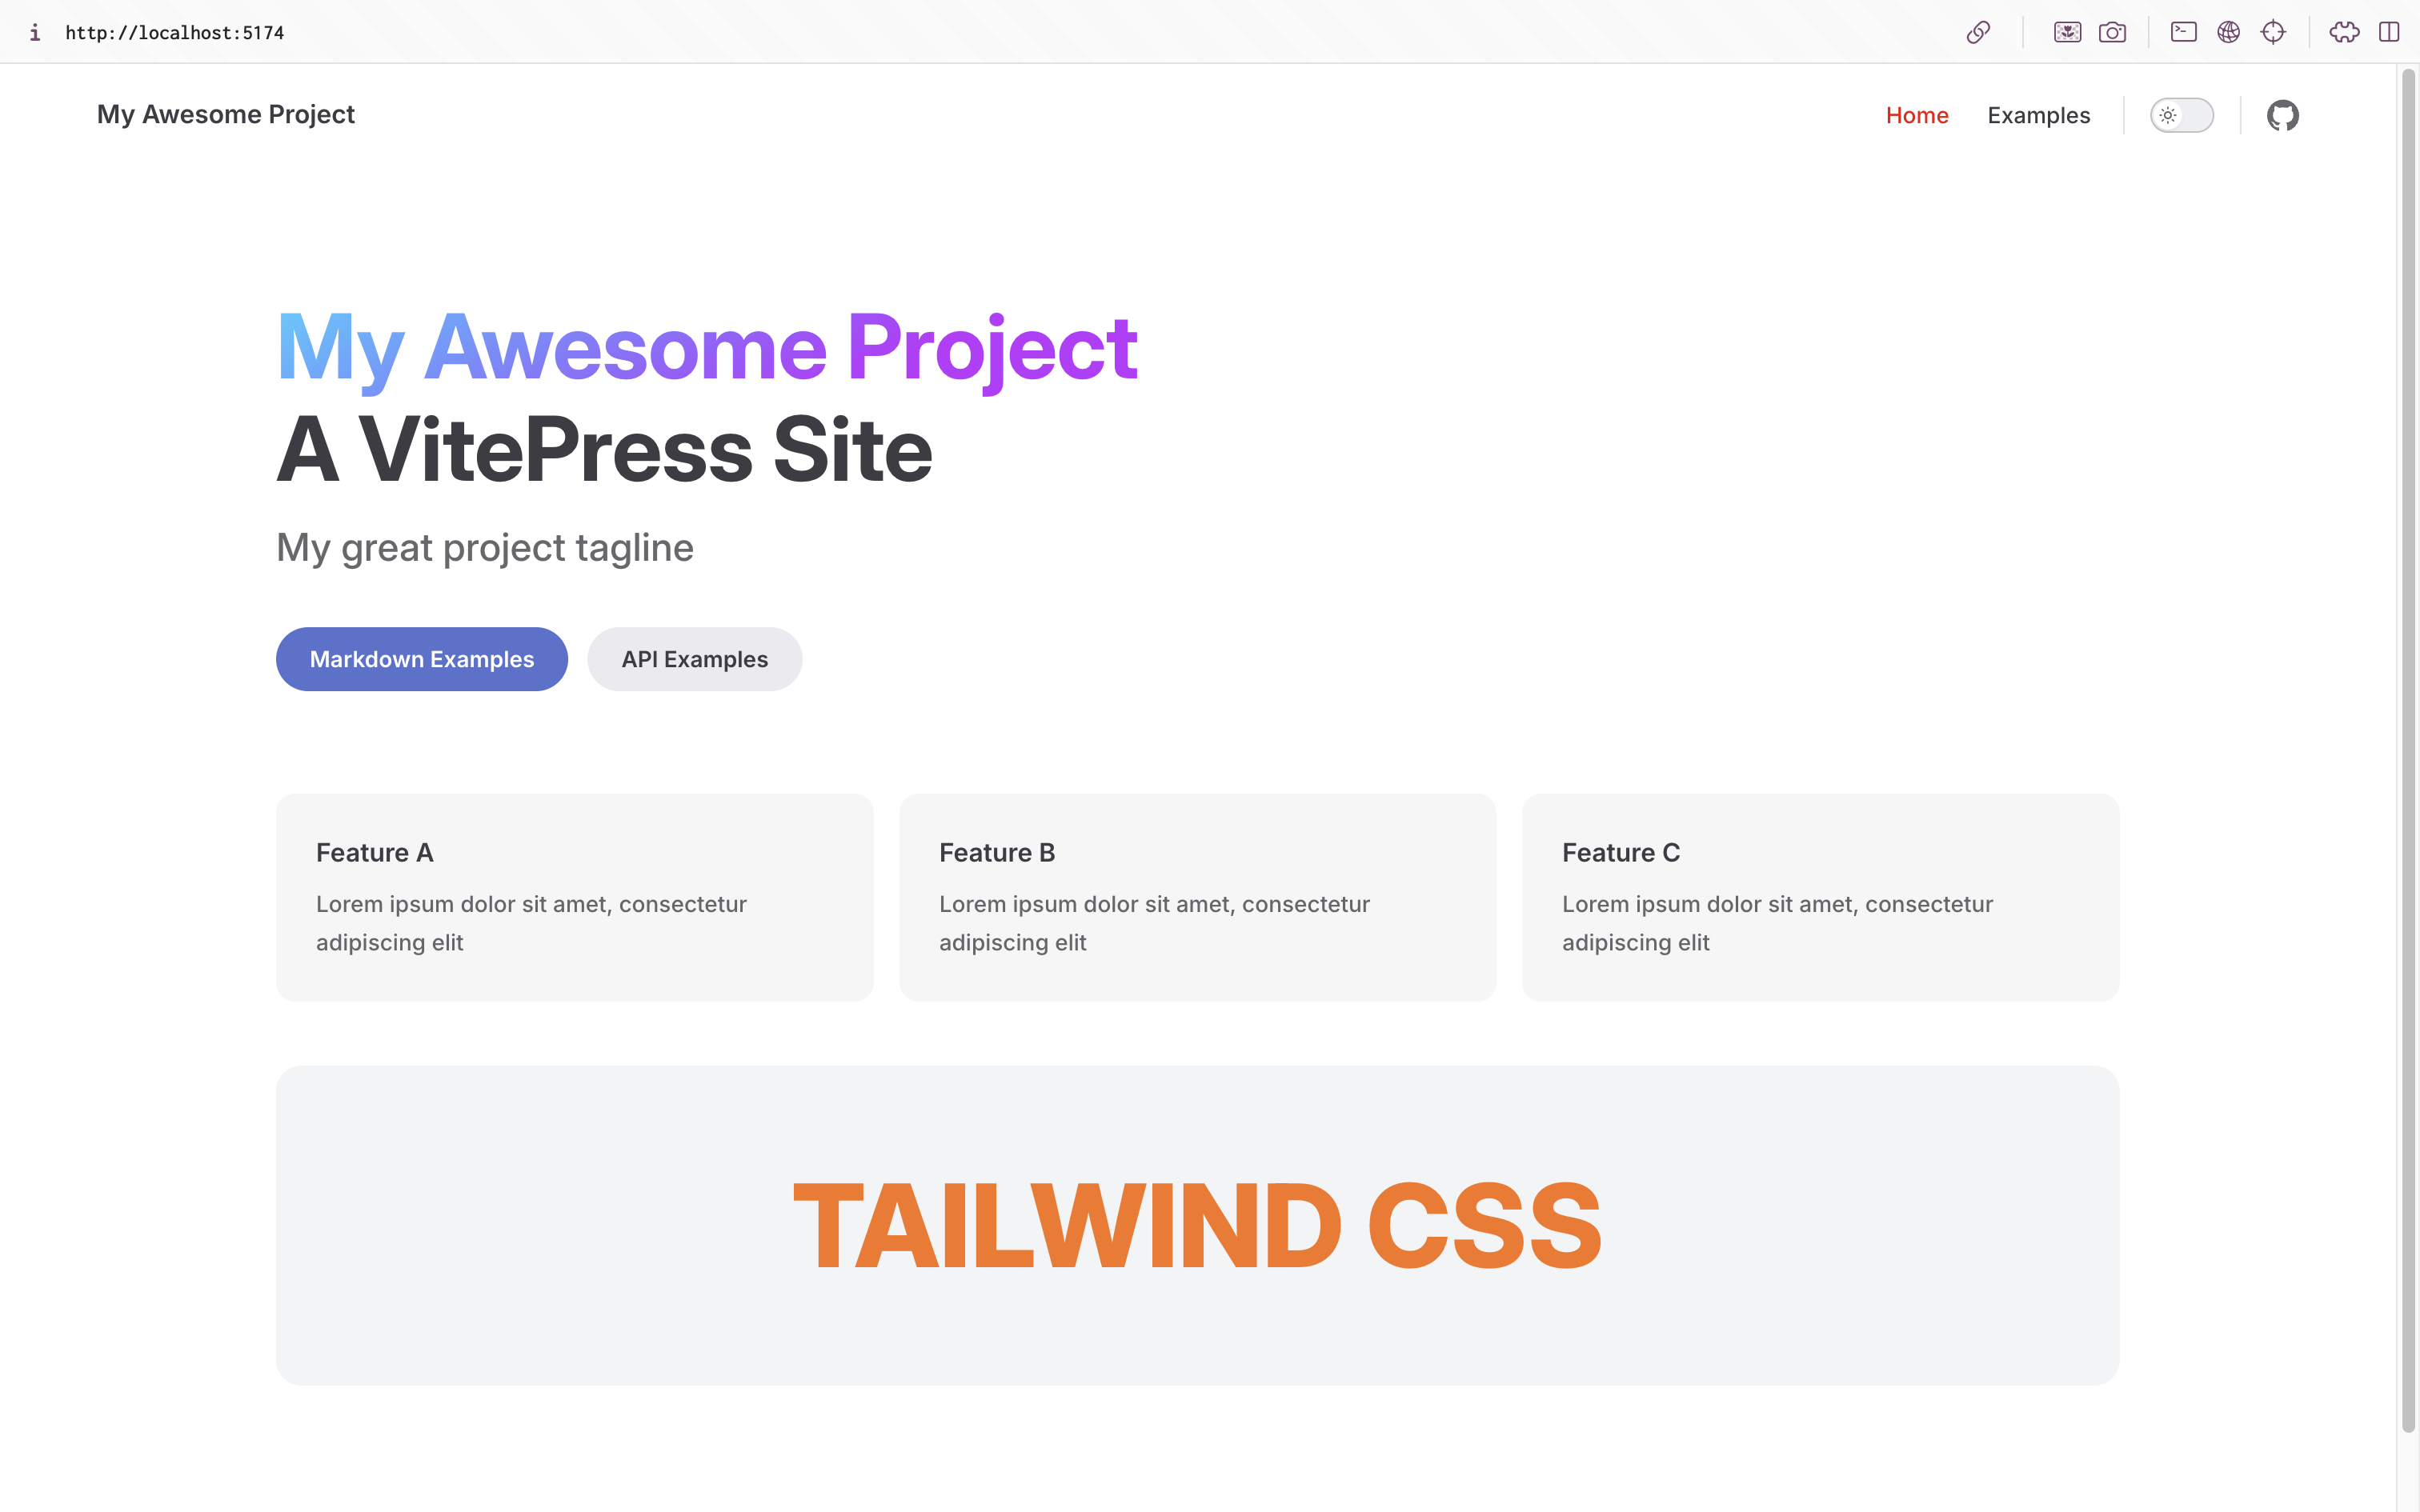
修改首页:`docs/index.md ,在文档最后增加:
md
<div class='bg-gray-100 rounded-2xl h-[200px] mt-10
           flex items-center justify-center
           text-7xl font-extrabold text-orange-500' >

TAILWIND CSS

</div>页面效果如下,下方增加了一个由 TailWind 定义样式的 <div/>:

定制 VPDoc 中大图
有的时候,你希望在 VPDoc 缺省文档模板中使用通贯左右的大图。你可以使用如下 css:
css
 .vp-doc .bigimage img {
  width: 100vw;
  max-width: 100vw;
  margin-left: calc(50% - 50vw);
  margin-right: calc(50% - 50vw);
}然后为图片加上如上样式:
md
<div class='bigimage'>

</div>